In Expression Blend 3, there is this new cool thing, called behaviors. In very simple words, these are special forms of objects which are attached to another object (usually an element in the UI) and perform some actions thus defining the
behavior of the element. The cool thing is that behaviors are reusable, and can be created in libraries and used in many projects. They're not tied to a specific application logic. Another nice thing is that once created, behaviors are extremely easy to attach to an element in XAML.
To demonstrate the power of behaviors, I decided to create a very simple pong-like game ( a game with a ball that is moving around the screen and you have to keep it from escaping) and I used 2 custom behaviors. So let's go through the process.
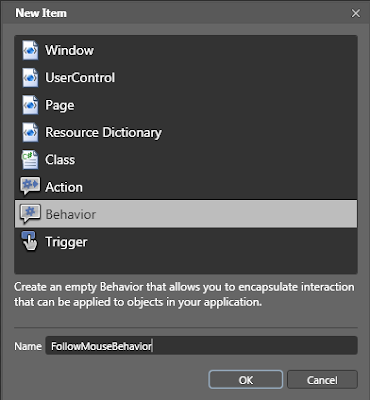
Getting Started Creating a custom behaviors is pretty simple. In Expression Blend, go to File -> New Item, and select Behavior.
Then, the code-file of the behavior will be opened. You can edit in Blend of course, but when it comes to writing code, I prefer Visual Studio.
The structure of a behavior
Blend will define a skeleton for your behavior. The most important methods inside are the OnAttached() and the OnDetaching() overrides. As suggested by the name, the OnAttached() method executes when the behavior is being attached to the element, so you should do some initializations there. In the OnDetaching() method, you can provide cleanup. Also in the behavior class you can define properties that control some settings. These properties will be displayed in the Properties section in Expression Blend when the behavior is selected.
The behaviors for my game
In my demo game, I need two types of objects. First type is the player controlled bars (four of them) that move on each side of the screen following the movement of the mouse. The second type is the ball that moves constantly and bounces off the player controlled bars. So as you can guess, I need two behaviors.
So let's see the first behavior I defined. I named it
FollowMouseBehavior. Here is the C# code.
using System;
using System.Collections.Generic;
using System.Text;
using System.Windows;
using System.Windows.Controls;
using System.Windows.Data;
using System.Windows.Documents;
using System.Windows.Input;
using System.Windows.Media;
using System.Windows.Media.Imaging;
using System.Windows.Shapes;
using System.Windows.Interactivity;
using System.ComponentModel;
using Microsoft.Expression.Interactivity.Core;


namespace WpfBehaviorsSample
{
public class FollowMouseBehavior : Behavior<DependencyObject>
{
   // add some private fields
   private Panel parentPanel = null;
   private Window parentWindow = null;

   // add some properties for the behavior
   public bool LockXAxis { get; set; }
   public bool LockYAxis { get; set; }
   public bool IsLimitedToParentPanel { get; set; }
   public bool IsEnabled { get; set; }

   public FollowMouseBehavior()
   {
       this.IsEnabled = true;
       IsLimitedToParentPanel = true;
   }

   protected override void OnAttached()
   {
       base.OnAttached();

       if (!DesignerProperties.GetIsInDesignMode(this) && this.AssociatedObject is UIElement)
       {
           // find the window and the panel in wich the current object is placed
           parentWindow = Common.GetAncestorOfType(this.AssociatedObject, typeof(Window)) as Window;
           parentPanel = Common.GetAncestorOfType(this.AssociatedObject, typeof(Panel)) as Panel;
           if (parentPanel == null || parentWindow == null) return;

           // add a handler for the mouse move event
           parentWindow.PreviewMouseMove += new MouseEventHandler(parentPanel_PreviewMouseMove);
       }
   }

   protected override void OnDetaching()
   {
       base.OnDetaching();

       // Cleanup
       if (!DesignerProperties.GetIsInDesignMode(this) && this.AssociatedObject is UIElement && parentPanel != null)
       {
           parentPanel.PreviewMouseMove -= parentPanel_PreviewMouseMove;
       }
   }


   void parentPanel_PreviewMouseMove(object sender, MouseEventArgs e)
   {
       if (!IsEnabled) return;

       // When the mouse is moved, make the attatched element to follow it

       Point position = e.GetPosition(parentPanel);

       if (parentPanel is Canvas)
       {
           double posX = LockXAxis ? Canvas.GetLeft(this.AssociatedObject as UIElement) : position.X;
           double posY = LockYAxis ? Canvas.GetTop(this.AssociatedObject as UIElement) : position.Y;
           if (IsLimitedToParentPanel && this.AssociatedObject is FrameworkElement)
           {
               double pW = parentPanel.ActualWidth;
               double pH = parentPanel.ActualHeight;
               double cW = (this.AssociatedObject as FrameworkElement).ActualWidth;
               double cH = (this.AssociatedObject as FrameworkElement).ActualHeight;

               if (posX > pW - cW) posX = pW - cW;
               if (posY > pH - cH) posY = pH - cH;
           }

           Canvas.SetLeft(this.AssociatedObject as UIElement, posX);
           Canvas.SetTop(this.AssociatedObject as UIElement, posY);
       }
   }

}
}
The code is pretty simple, so I don't think I need to explain it in depth. First of all we find in what window the element is placed, and we add an event handler to this window's mouse move event. Then on mouse move, we just get the mouse coordinates, and change the objects coordinates to follow, according to the settings we defined (for example lock X or Y axis. that causes the element to move only horizontally or vertically, of course it can be moved both horizontally and vertically).
OK, let's look at the second behavior. This will cause an element (in our case, the pong ball) to move around the screen and when it hits another object, to change it's velocity. So this is the MovingBouncingBehavior.
using System;
using System.Collections.Generic;
using System.Text;
using System.Windows;
using System.Windows.Controls;
using System.Windows.Data;
using System.Windows.Documents;
using System.Windows.Input;
using System.Windows.Media;
using System.Windows.Media.Imaging;
using System.Windows.Shapes;
using System.Windows.Interactivity;
using System.ComponentModel;
using System.Windows.Threading;
using Microsoft.Expression.Interactivity.Core;

namespace WpfBehaviorsSample
{
 public class MovingBouncingBehavior : Behavior<DependencyObject>
 {
     private static Random random = new Random();
     private Panel parentPanel = null;
     private Window parentWindow = null;
     private DispatcherTimer timerAnimation = null;
     private Vector velocity = new Vector(0, 0);

     public double MinVelocityX { get; set; }
     public double MinVelocityY { get; set; }
     public double MaxVelocityX { get; set; }
     public double MaxVelocityY { get; set; }
     public event EventHandler LeftParentBounds;

     public bool IsEnabled { get; set; }

     private TimeSpan animationInterval = TimeSpan.FromMilliseconds(10);
     public TimeSpan AnimationInterval
     {
         get { return animationInterval; }
         set { animationInterval = value; CreateTimer(); }
     }

     public MovingBouncingBehavior()
     {
         AnimationInterval = TimeSpan.FromMilliseconds(10);
         MinVelocityX = 1.0;
         MinVelocityY = 1.0;
         MaxVelocityX = 10.0;
         MaxVelocityY = 10.0;
     }

     protected override void OnAttached()
     {
         base.OnAttached();
         if (!DesignerProperties.GetIsInDesignMode(this) && this.AssociatedObject is UIElement)
         {
             parentWindow = Common.GetAncestorOfType(this.AssociatedObject, typeof(Window)) as Window;
             parentPanel = Common.GetAncestorOfType(this.AssociatedObject, typeof(Panel)) as Panel;
             if (parentPanel == null || parentWindow == null) return;

             velocity = new Vector(GetRandomVelocity(true), GetRandomVelocity(false));
             if (timerAnimation != null) timerAnimation.Start();
         }
     }

     protected override void OnDetaching()
     {
         base.OnDetaching();
         if (!DesignerProperties.GetIsInDesignMode(this) && this.AssociatedObject is UIElement && parentPanel != null)
         {
             if (timerAnimation != null) timerAnimation.Stop();
         }
     }

     private double GetRandomVelocity(bool x)
     {
         if (x)
         {
             return MinVelocityX + random.NextDouble() * (MaxVelocityX - MinVelocityX);
         }
         else
         {
             return MinVelocityY + random.NextDouble() * (MaxVelocityY - MinVelocityY);
         }
     }

     private void CreateTimer()
     {
         if (timerAnimation == null)
         {
             timerAnimation = new DispatcherTimer();
             this.timerAnimation.Tick += new EventHandler(timerAnimation_Tick);
         }
         timerAnimation.Interval = AnimationInterval;
     }

     void timerAnimation_Tick(object sender, EventArgs e)
     {
         if (!IsEnabled) return;
         if (parentPanel is Canvas && this.AssociatedObject is FrameworkElement)
         {
             FrameworkElement ui = this.AssociatedObject as FrameworkElement;
             Point pointNow = new Point(Canvas.GetLeft(ui), Canvas.GetTop(ui));
             Point pointMoved = pointNow + velocity;

             // check for collisions

             bool collisionFound = false;

             int cycleSafetyCounter = 50;
             do
             {
                 cycleSafetyCounter--;
                 pointMoved = pointNow + velocity;
                 Rect rc = new Rect(pointMoved, new Size(ui.ActualWidth, ui.ActualHeight));
                 collisionFound = false;

                 // scan all children of the canvas
                 foreach (UIElement child in parentPanel.Children)
                 {
                     if (child is FrameworkElement && child != ui)
                     {
                         Rect rcChild = new Rect(Canvas.GetLeft(child), Canvas.GetTop(child),
                             (child as FrameworkElement).ActualWidth, (child as FrameworkElement).ActualHeight);
                         if (rcChild.IntersectsWith(rc))
                         {
                             rcChild.Intersect(rc);
                             bool shouldReverseX = random.Next(0, 2) % 2 == 0;
                             bool shouldReverseY = random.Next(0, 2) % 2 == 0;
                             velocity = new Vector(
                                 GetRandomVelocity(true) * (shouldReverseX ? -1 : 1),
                                 GetRandomVelocity(false) * (shouldReverseY ? -1 : 1));
                             collisionFound = true;
                             break;
                         }
                     }
                 }
             }
             while (collisionFound && cycleSafetyCounter > 0);

             Canvas.SetLeft(ui, pointMoved.X);
             Canvas.SetTop(ui, pointMoved.Y);

            if (pointMoved.X < 0 || pointMoved.Y < 0 || pointMoved.X > parentPanel.ActualWidth
                    || pointMoved.Y > parentPanel.ActualHeight)
                {
                    if (LeftParentBounds != null)
                    {
                        LeftParentBounds(this, EventArgs.Empty);
                    }
                }
         }
     }
 }
}
This behavior also has some settings. The ting it does, it creates a timer and then on each tick it moves the element to which it's attached, and checks for collisions. When a collision is found, the velocity is changed. Again, let's not go through the logic, the post is about behaviors, not about making a pong game.
Attaching a behavior to an elementAs I said before, attaching behaviors is pretty simple. Now you'll see how it's done.

See? Easy. Just set which behavior to use and change some settings (or, leave the dafault values, of course). Now our element (rectangle in this case) has a behavior. When we run the application and move the mouse, we see that this rectangle moves with it. You can add this behavior to any number of objects, and they'll all behave alike. All that's left to do is attatch the MovingBouncingBehavior to the ball element, edit some brushes (because, the application has to look nice, of course), and run.
Few lines of code, and you have a working game. Pretty powerful things, behaviors.
Thanks for reading. If you want the full demo application, check out the link below.
Download Sample ApplicationYou can download the sample from
this link.